

Engine rebuild, Rover V8 3.9
The cars > Developments and changes > Engines and engine related changes
The demise of the Engine
During the final event of the 2014 season at Walters Arena the car suffered what turned into a series of terminal mechanical failures.
The transfer box kept jumping out of High box until finally it would only run in Low box. We decided that we would keep going and do the last lap of the day in Low box and then look more closely at the problem. Well the lap started very well the car being impressively responsive on the early technical stuff, however, when we reached the long straits things started to go amiss. I was already aware that the engine was showing all the warning signs of being "A bit tired"!So as we are proceeding along these straights in low box with the engine running on the rev limiter the engine started to feel tight and the power dropped. On the second long straight it was to all come to an end...
BANG!
Tinkle tinkle & a cloud of blue smoke.
We immediately new something had given up, and we just coasted to the next marshal point.
And that as they say was the end of our season;
Here are a few pictures of what happened;
Once the engine was lifted out and stripped this is what we saw;
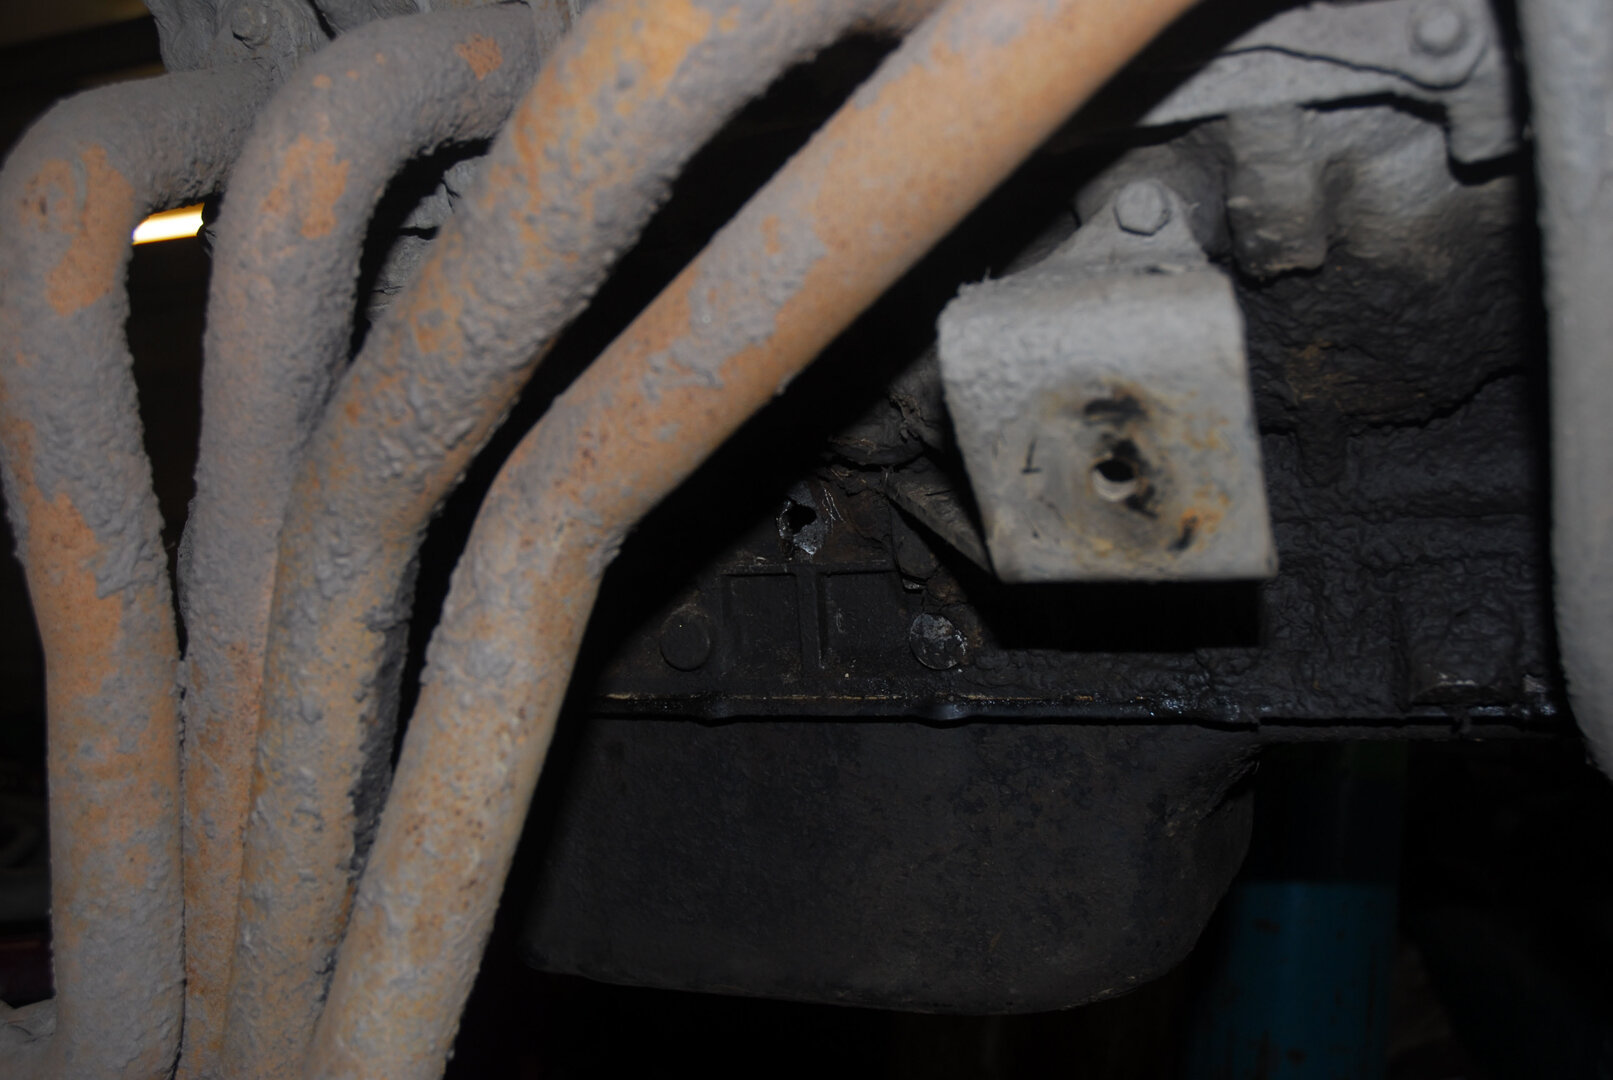
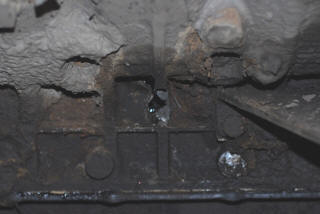
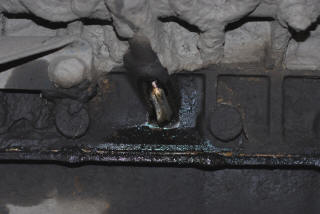
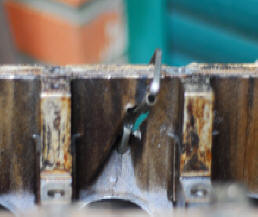
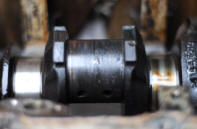
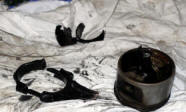
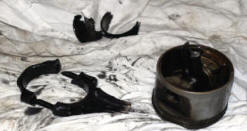
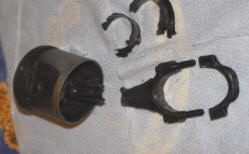
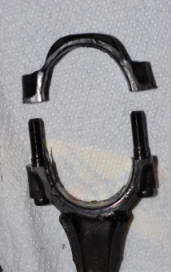
The engine in the car was completely destroyed. This was the result of running a tired engine to the limit (and beyond the limits) over an extended period of time. The old engine had been giving out warning signs for several events, knocking on hard acceleration and low oil pressure at idle, so it was no major surprise running a lap in low box finished it off.
This is the story of the build of a replacement engine, the frustration, mistakes, some of the lessons learnt and the joy of finally getting it to run.
The plan was to build the best possible engine, but keeping the costs within reasonable boundaries. I also wanted to improve on the power available without over stressing the engine and transmission, the idea being to get a strong powerful engine that should last some time without breaking the bank.
I already had a engine block from another donor vehicle. The basic engine is a Rover V8 3.9 EFI serpentine unit from a late Disco 1. These are generally good strong units with a proven history and parts that are reasonably easy to get, therefore a little cheaper than some of the more exotic options.
Although as it turned out later, getting hold of a good one is starting to get more difficult.
The first thing to do was get this stripped and checked out;
The engine was duly stripped and the block and crank was sent to the engineers to determine if it was within tolerances etc.
The feedback was very good;
The block just needed a basic re-bore and the crank had very little wear evident and only required a polish.
Once this was established (or so we thought) the procurement of parts started.
Once this was established (or so we thought) the procurement of parts started.
- New piston, these are standard cast items +20 oversized with rings etc.
- A set of cam bearings, Clevite
- New cam, Viper Cyclone. a high lift camshaft, but not too extreme.
These parts were provided to the engineering company and they where instructed to do the work including replacing the cam bearings. They needed the pistons to ensure that all final fits where correct and the cam shaft to ensure correct alignment of the cam bearings, the cam must run freely in the new bearings.
The engine was re-bored to +20 and the new cam bearings fitted (and matched to the new cam shaft). The crank proved to need no work other than a polish to clean it up.
At this point I also purchased several other parts ready to start building the engine back up when I got it back from the engineers.
- Big end shells, Clevite
- Main bearing shells, Clevite
- Timing gears and chain, Cloyes “Street True-Roller” set
- Main bearing stud kit, ARP. This was to subsequently cause a lot of problems
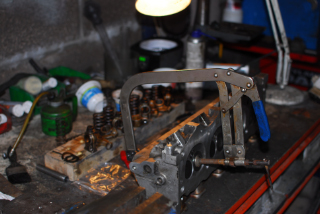
Once this was all done and we got all the parts and reworked block into the "Engine shed" the engine build could start in earnest.
The engine block in the back of the "Engine Shed" on the stand ready to start the build.
As you may see its a very small (dark) space and not the perfect place for this nature of work.
As you may see its a very small (dark) space and not the perfect place for this nature of work.
Crank, pistons con-rods all in place.
Crank, pistons con-rods all in place.
Note the use of ARP studs in the main bearing caps and that in this engine the main bearing caps are the fully enclosed type. I could have "cross bolted" these but decided not to at this point as the use of studs should massively improve and reduce any risk of cap shimmy/chatter.
Note the use of ARP studs in the main bearing caps and that in this engine the main bearing caps are the fully enclosed type. I could have "cross bolted" these but decided not to at this point as the use of studs should massively improve and reduce any risk of cap shimmy/chatter.
The cylinders where fitted "dry" using only silicon as a lubricant, recommended by some engine builders as it allegedly reduces the risk of "glazing" during the run in period. This was to be the first of several mistakes (read on......)
The main bearings where torqued up to 110 lbs. ft. as per the documentation received with the studs. Potential mistake number two (remember this as you read on).
Cam shaft fitted in place with plenty of cam lube, the followers would be next.
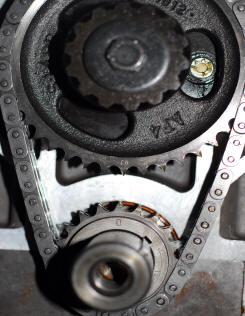
Roller timing chain and sprockets in place the lower sprocket has three positions to enable the cam to be set up advanced or retarded. By changing the cam timing, enhancements to the camshaft characteristics can be achieved. For example, retarding the cam timing will increase high RPM horsepower, and advancing the cam timing will increase low-end torque.
I have set this engine up to to use high end power as the engine spends most of its time in full throttle conditions in the events I do.
I have set this engine up to to use high end power as the engine spends most of its time in full throttle conditions in the events I do.
At a later stage I also purchased parts to rebuild the cylinder heads;
- Cylinder head stud kit
- New inlet valves
- New exhaust valves
- Bullet valve guides
and finally all the other bits needed to assemble the engine;
- Hydraulic cam followers
- New push rods
- New rockers
- New rocker shafts
- Rocker shim set
- Top gasket set
- Bottom gasket set
- New oil pump gears (serpentine, crank driven)
Before the heads were sent away for some more engineering work considerable time was spent gently "Porting" and "matching" the inlet and exhaust ports. I did not go overboard with this as I don't have the facilities to do proper gas flow analysis etc. however, just making all the ports a similar size and removing the obvious obstructions should make a difference?
The cylinder heads returned from the engineering company having completed the following work;
The head faces skimmed, new "bulleted" valve guides fitted and the valve seats recut to suit the new valves.
The rebuild of the heads can start.
The head faces skimmed, new "bulleted" valve guides fitted and the valve seats recut to suit the new valves.
The rebuild of the heads can start.
Fitting the new valves with new valve springs and seals. Most of the valves in place!

Cylinder heads going back into place.
It's just possible to make out the new head studs on the left hand side.
It's just possible to make out the new head studs on the left hand side.
Cylinder heads bolted back on with new followers, push rods and rebuilt rocker gear all fitted.
The rocker pedestals have been shimmed to compensate for the skimmed heads and new high lift cam shaft.
The rocker pedestals have been shimmed to compensate for the skimmed heads and new high lift cam shaft.
All the ancillaries fitted ready to return the "mill" back to its home in the car.
All the front covers and distributor in place. The distributor was aligned with the rotor pointing to No1 whist the engine was at TDC.
The rebuilt engine back in place and almost ready to run!
Or so we thought!............
When we came to start the engine things started to go wrong!
Firstly before I even started the engine I had some concerns that the engine felt a bit "tight".
Every one I had spoken to up to this point had "agreed" that the main bearings should be torqued to the 110 lbs/Ft figure, however, I found various reports that this sometimes will not work. I found some details for the later 4.2 engine that listed different lower figures (and subsiquently, years later the instructions are changed).
The sump was duly removed and the main bearing re-torqued to a new lower figure 90 lbs/ft. Things did feel a bit better.
The engine was re-filled with the oil and running-in lubricants. Initially the engine was turned over with no plugs etc. to get the oil primed and the pressure to a basic minimum, the engine felt like it was turning freely with no untoward noises etc.
The plugs where refitted and we tried to start the engine!!!
However, It was not to be!
The engine turned and even once or twice "popped" and "banged", no matter what we did it would not run!
Many things and many different "fixes" where tried out. Including striping the front end from the engine to double check the cam timing, several compression checks where carried out, these where not perfect but well within acceptable ranges. We had an expert plug in diagnostic equipment, all to no avail.
Several people, many hours of head scratching later we where forced to give up as the first event was only two weeks away now!
The car was loaded onto the trailer and taken to its alternative home in the South West, in the vain hope something could be done mid week rather than just at the weekends. After several more attempts at the alternative workshop, the cylinders where primed with oil and left over night to soak.
The next day the plugs where refitted and the starter button pressed;
The car stared and ran.
Briefly!
Very quickly more problems started to present themselves, the engine ran hot, boiled and overheated, blowing most of the water out of the coolant circuit. It looked like a blown head gasket!
All the bores are clean and dry and only slight signs of soot.
Engine Strip-build #2
No signs of any damage at this point and everything looks clean.
The top end was reassembled with new gaskets etc. The oil pressure primed and the start button pressed again;
It started, however, the engine started to run hot again (this time it did not boil) it quickly became evident that the cooling fan was not cutting in. This was investigated and diagnosed as the fan-motor being full of "Gunk". The motor was stripped, cleaned, reassembled and tested. Now with the fan cutting in and out the engine runs at a good temperature.
All well and good, so you would think:
Now the oil pressure light starts to come on and stubbornly will not go out again even at relatively high rev's, The engine is immediately stopped before any serious damage can occur. More head scratching and various tests etc. are performed.
Finally the sump was pulled off again and the bottom end stripped and investigated.
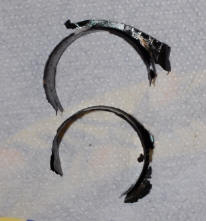
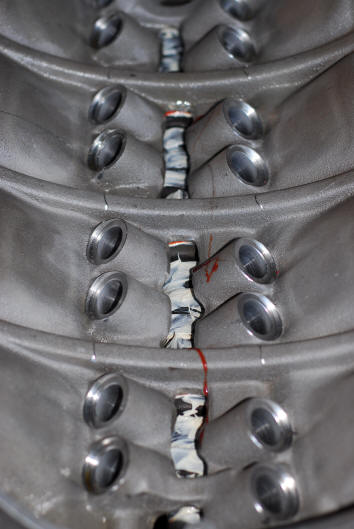
The main bearings where totally striped of any bearing face and on further investigation a mat of fibrous debris was found totally blocking the oil strainer, hence no oil pressure!
What appears to have happend is the main bearings have suffered what is technically referred to as "Wire Wooling".
I tried to replace the main bearings with the engine still in place. Although many people claim to be able to do this I could not, so the engine was removed again and inverted.
Engine strip and re-build # 3
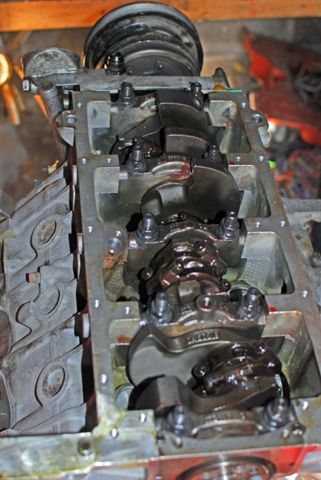
On stripping things down with the engine inverted in the engine stand again,
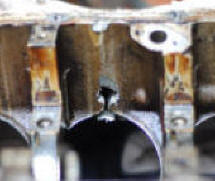
This is what I saw!
This is what I saw!
The picture is looking "up" through the engine with the crank shaft removed this shows the number one cam-shaft bearing that appears to have "walked" out of the Block.
The engine block is completely stripped (only leaving the cam shaft in place) and returned to the engineers that originally replaced the bearings for investigation.
It was not possible to determine the true cause of why this has happened, and there is no damage to the cam etc. however, the cam bearings where replaced and refitted FOC.
I cannot help but keep asking myself did the loss of oil pressure contribute to the bearing moving out or did the bearing location cause the oil pressure drop? Look at a diagram of the oil paths around this engine and decide for yourself?
Now the next issue becomes apparent. During this rework the main journals are measured and deemed to be out of true. I was advised that this would require "line boring" of the main bearing journals, however, this engineering company could not do this work and finding an engineer that could proved very difficult.
The first company I took the block to for line-boring, deemed the block too far out of true (oval) to do successfully, effectively declaring the block scrap!
"Panic"
After pulling in some more favors, a new replacement engine was found, collected and stripped. Ready to start the entire process all over again!
While this is going on I am still making phone calls, and find a company that is willing to look at the original engine.
So the original block and crank are shipped out to yet anther engineering company (That's number four by the way).
In very short order I have the engine back, line bored and assembled with a set of test bearings with a freely turning crank and some more advise on assembly techniques.
This time the crank main bearings are tightened to approximately 80 - 90 lbs/Ft. The technique however was very different. The bearings where tightened in sequence and stages as normal however once over 60 lbs/ft the crank was continually turned and the bearing tightened in smaller stages until the crank started to bind. I took note of the torques at this point. Next I slackened the entire assembly and re torqued to a figure just short of the bind point (still checking the crank rotates freely).
It should be noted that the thread that the nuts run on, on the studs is a finer pitch so the clamping force through the caps is significantly higher even if I had tightened the nuts to the standard LR figures.
The engine is back in the engine shed and rebuild starts again! #4
After all the work was done finally somewhere in a secret testing location in the South West.